Handling Multiple Network Subnets
By default, Windows Home Server assumes that all the computers on your home network lie within the same subnet,
which is a subsection of a network that uses related IP addresses. For
example, suppose that your Windows Home Server computer uses the IP
address 192.168.1.254 and a subnet mask of 255.255.255.0. This means
that the subnet that Windows Home Server can “see” is the IP address
range 192.168.1.1 to 192.168.1.254. Working from client to server, any
computer on your network that has an IP address within that range can
therefore “see” Windows Home Server and connect to it. Windows Home
Server allows this because its Windows Firewall is configured to allow only traffic that comes from the local subnet.
This works fine in the
majority of home networks. However, you may have clients on your network
that aren’t on the same subnet as Windows Home Server. For example, you
might have clients that use IP addresses in the range 192.168.0.2 to
192.168.0.254. (The default address in some routers is 192.168.0.1, so
if you have clients that get IP addresses assigned from that router, the
addresses will be in the 192.168.0.x subnet.) This represents a different subnet, so those clients might not be able to see Windows Home Server or connect to it.
To handle this problem,
you need to configure the Windows Home Server subnet mask, which is a
series of numbers that looks something like an IP address, but that
tells Windows Home Server which subnet it’s part of. On most systems the
default subnet mask is 255.255.255.0, which means that the subnet
consists of those computers where the first three IP address values are
identical, and that have any value in the fourth position. For example,
if the router address is 192.168.1.1 and your Windows Home Server
machine uses the 255.255.255.0 subnet mask, the server will only see
computers with IP addresses that start with 192.168.1 (that is,
192.168.1.2 through 192.168.1.254). The server will not see computers that use addresses such as 192.168.0.2 and 192.168.0.3.
To broaden the subnet to
include any value in the third and fourth IP address positions, you need
to use the subnet mask 255.255.0.0. For example, if the router address
is 192.168.1.1 and your Windows Home Server machine uses the 255.255.0.0
subnet mask, the server will see computers with IP addresses that start
with 192.168.0 (that is, 192.168.0.2 through 192.168.0.254), 192.168.1
(that is, 192.168.1.2 through 192.168.1.254), and so on.
Assuming you’ve already
configured your Windows Home Server with a static IP address, as I
described earlier, follow these steps to adjust the subnet mask:
1. | Log on to Windows Home Server either locally or by using a Remote Desktop connection.
|
2. | Select Start, type network, and then click View Network Connections to open the Network Connections window.
Tip
You can also click the network
icon in the notification area, click Open Network and Sharing Center,
and then click Change Adapter Settings.
|
3. | Double-click the icon for the connection to your local area network. The connection’s Status dialog box appears.
|
4. | Click Properties. The connection’s property sheet appears.
|
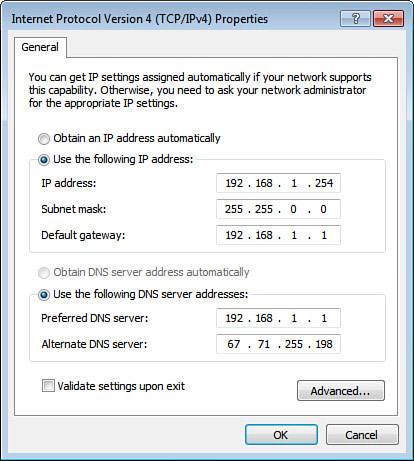
5. | On the General tab, click Internet Protocol Version 4 (TCP/IPv4), and then click Properties.
|
6. | Use the Subnet Mask field to change the mask to 255.255.0.0, as shown in Figure 1.
|
7. | Click OK to return to the connection’s property sheet.
|
8. | Click Close to return to the Status dialog box.
|
9. | Click Close. |
Making a Remote Desktop Connection to the Server
Windows Home Server’s
Remote Desktop feature enables you to connect to the server from a
workgroup computer and use the server’s desktop just as though you were
sitting in front of it. This is handy if you can’t leave your desk but
need to tweak a setting or run a program on the server.
Making Sure That Windows Home Server Is Ready to Host
Out of the box, Windows
Home Server is configured to host remote desktop sessions using the
Administrator account. However, just to be safe, you should run through
the following steps to make sure that Windows Home Server is configured
properly:
1. | Select Start, right-click Computer, and then click Properties to open the System Properties window.
|
2. | Click the Remote Settings link. The System Properties dialog box appears with the Remote tab displayed.
Tip
To open the System Properties dialog box with the Remote tab displayed directly, select Start, type systempropertiesremote, and then press Enter.
|
3. | In
the Remote Desktop group, make sure that the Allow Connections from
Computers Running Any Version of Remote Desktop option is activated.
Tip
If your network will only
connect to the server’s remote desktop using Windows 7 computers, you
can ensure much greater security by selecting the Allow Connections Only
from Computers Running Remote Desktop with Network Level Authentication
option.
|
4. | Click Select Users to display the Remote Desktop Users dialog box.
|
5. | Above
the Add button, you should see Administrator Already Has Access. If
not, click Add to display the Select Users dialog box, type Administrator, and click OK.
|
6. | Click OK to return to the System Properties dialog box.
|
7. | Click OK.
|
Making the Connection to the Server
On the client computer, you can now connect to the host computer’s desktop. Follow these steps:
1. | Select
Start, All Programs, Accessories, Remote Desktop Connection. (In
Windows XP, select Start, All Programs, Accessories, Communications,
Remote Desktop Connection.) The Remote Desktop Connection dialog box
appears.
|
2. | In the Computer text box, type the name or the IP address of the Windows Home Server computer.
|
3. | Click Connect. Windows prompts you to enter your security credentials.
|
4. | If the displayed username is something other than Administrator, click Use Another Account and then type Administrator in the User Name text box.
|
5. | Type
the Windows Home Server Administrator account password in the Password
box, and then click OK. (Note that in subsequent logons, you’ll only
need to type the password.)
|
The remote desktop then
appears on your computer. If you’re working in full-screen mode, move
the mouse to the top of the screen to see the connection bar, shown in Figure 2.
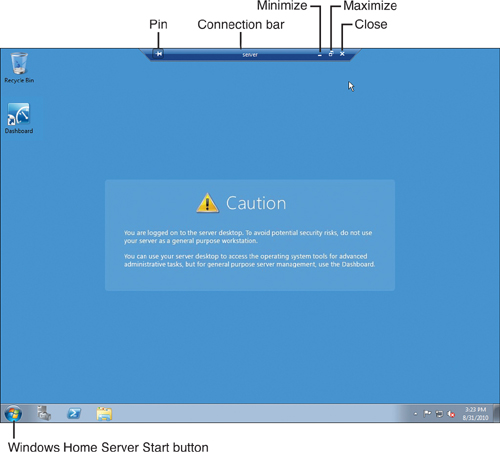
If you want the
connection bar to appear all the time, click to activate the Pin button.
If you need to work with your own desktop, you have two choices:
- Click the connection bar’s Minimize button to minimize the Remote Desktop window.
- Click the connection bar’s Restore button to display the Remote Desktop window.
Disconnecting from the Server
When you finish with the Remote Desktop session, you have two choices for disconnecting:
- Using the Windows Home Server desktop and selecting Start, Log Off.
- Clicking
the Close button in the connection bar. Windows displays a dialog box
to let you know that your remote session will be disconnected. Click OK.